

Post by tequilaman on Jul 20, 2016 21:58:23 GMT
Hi guys,
as promised here is some sort of a tutorial. I just sommon up what I did to make my idea of cheap and good looking lamps that do actually glow come to the tabletop in 10 steps. As I try to work efficient in the hobby you will see that I have made all my lamps at once like a production line. That's why I would suggest if you want to build them choose your amount of lamps first. I chose to build 6 lamps.

Components:
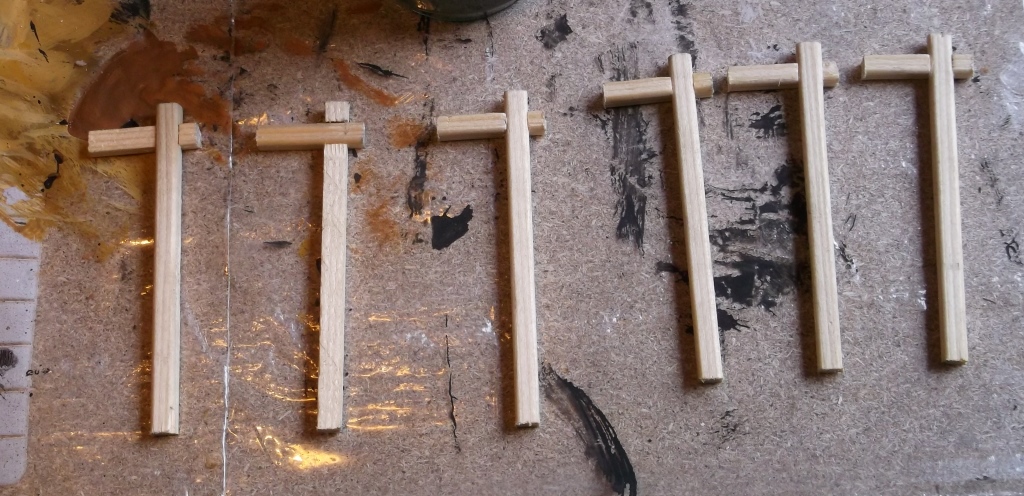
Step 0:
I choose to have my lampposts in the shape of gallows. I sawed the New Year's Eve Rocket sticks into a a short and a long stick for every lamp. The long side is roughly 9,5 cm and the short side is roughly 3 cm. Don't go too high as your lamps could fall over when placed onto terrain. With this length a human Confrontation model will fit under the lamp easily. I sawed half in where I wanted them to join. Then I cleaned them with a knife, sanded them. Knife and wire brush were used to get more wood texture to the sticks. Then I glued them together with PVA.
Step 1:
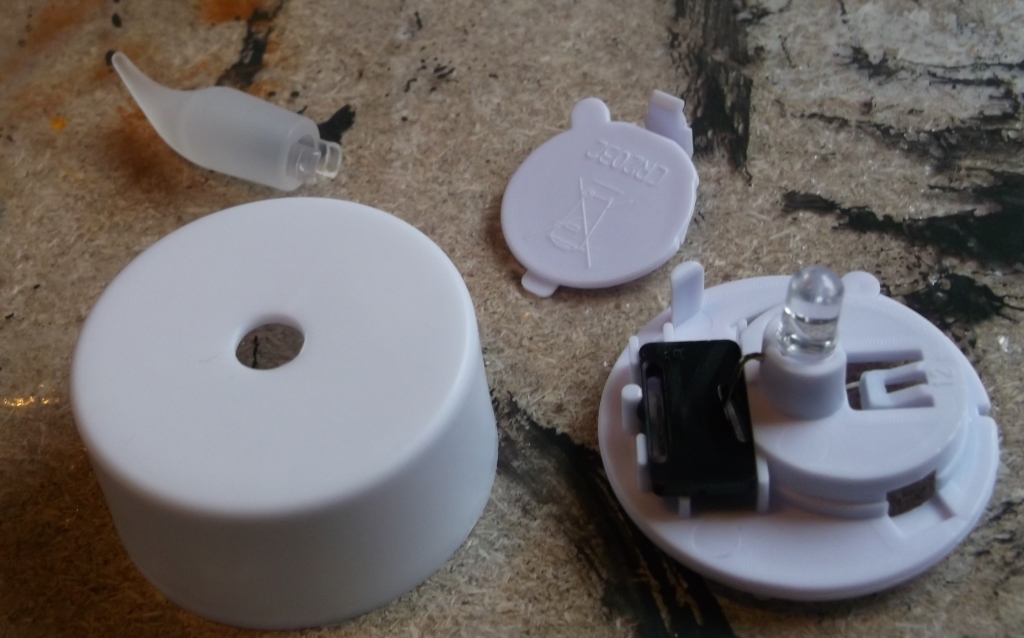
I took the tealights carefully apart.
Step 2:
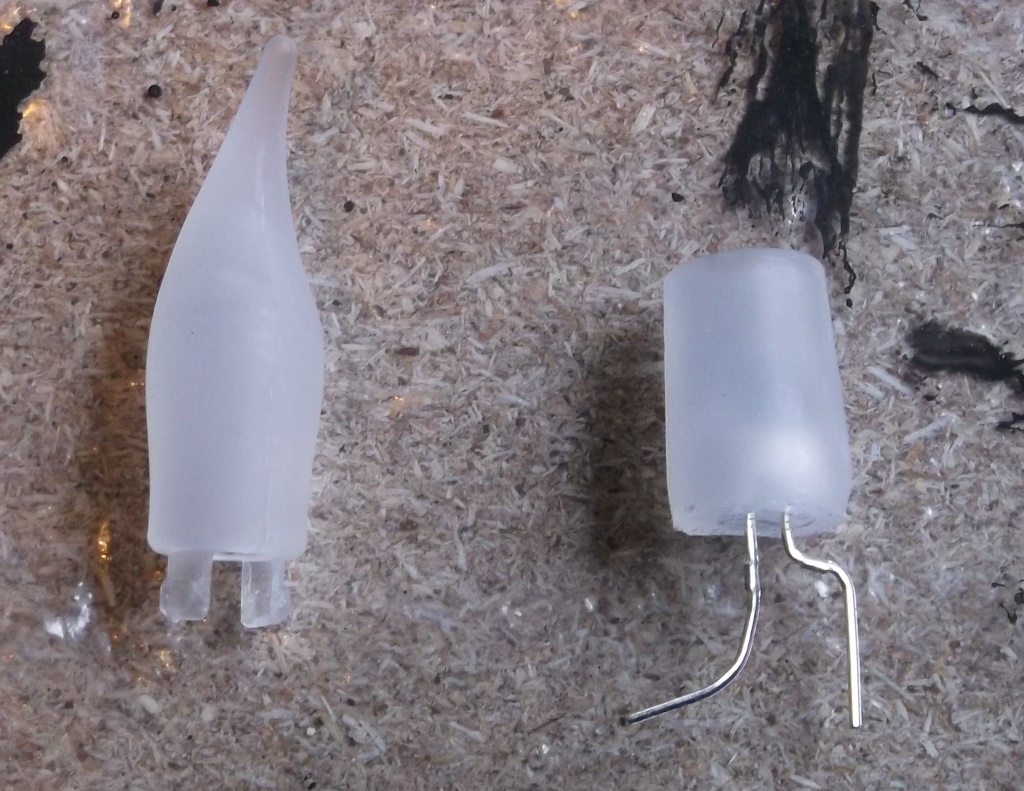
I took the fake flame, without the LED inside, and carfully sawed the top off. That will later be be used upside down to build the translucent body of the lamps. Then I checked that the LED will fit in on the other end.
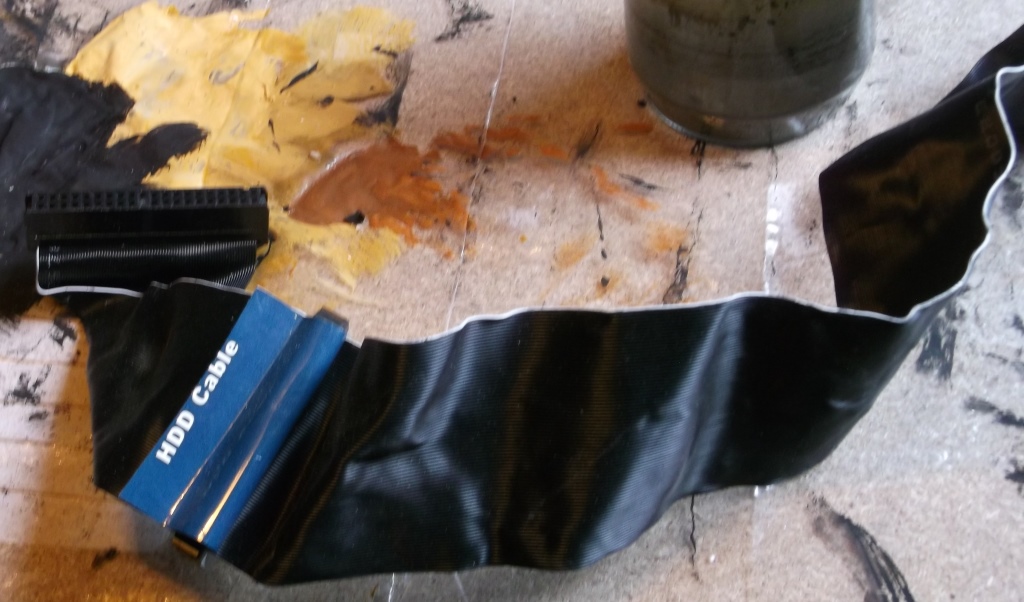
Step 3:
Then I pealed of the connector plug of the IDE cable and carefully pealed of pairs of two wires, on pair for each lamp. i was surprised how easy it was to get pairs of two off the cable.

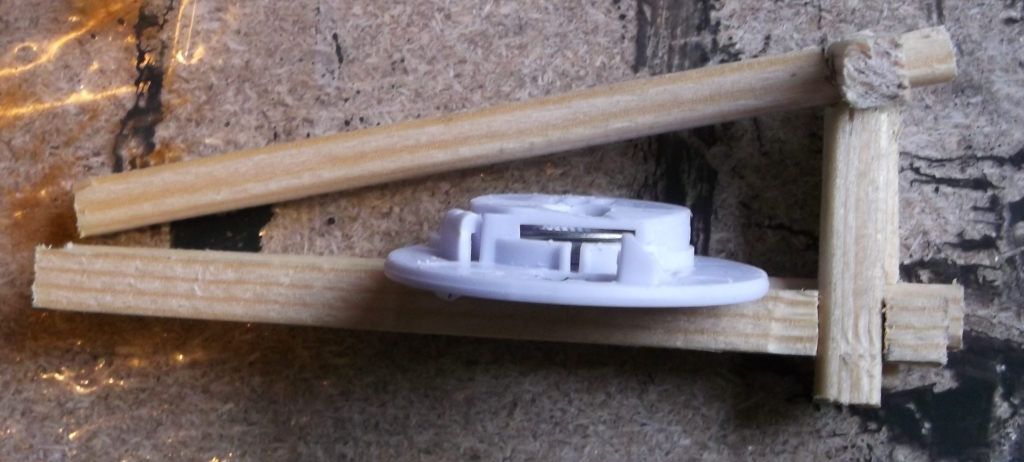
Step 4:
I choose to use the tealight stands so i cut everything away that added hight and made a square whole for the gallow to sit in. Then the LED was soldered to a pair of that wire from Step 3. Then a channel was carched into the gallows for the cable to fit in flush.
Step 5:
I started the lamps themselves with a square piece of plastic card and glued it under as a base and formed the top with glued on plastic card triangles. I used tinny plastic pipes, that I had in my bits box for a while, and carefully cutted them in half to frame the body of the fake flame. If you have some gaps in this step don't worry, we come to that later. Leave your lamps to dry completly before you continue on them.
Step 6:
I wrapped and glued a rectangle piece of paper around the lamp stand. Then I covered all gaps with putty, white Milliput in my case. Give the putty enough time to dry, don't be like me. Or you have to fix some stuff up.
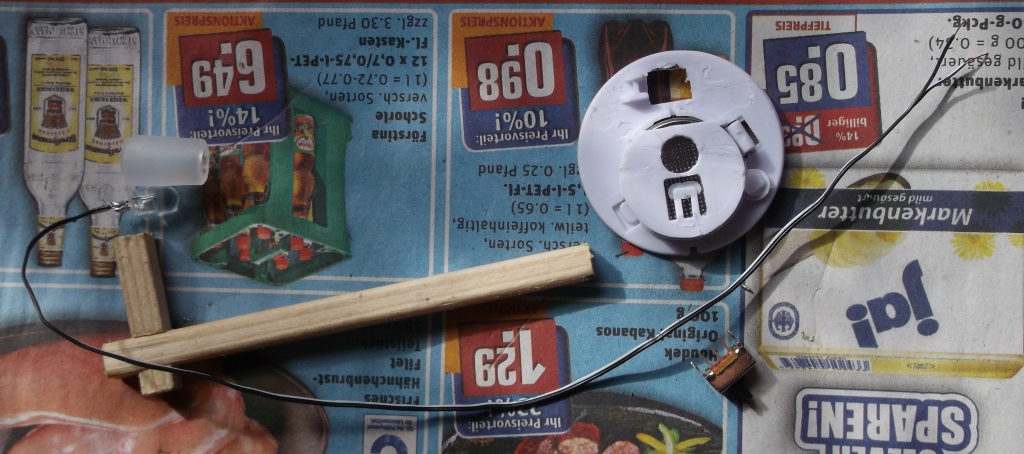
Step 7:
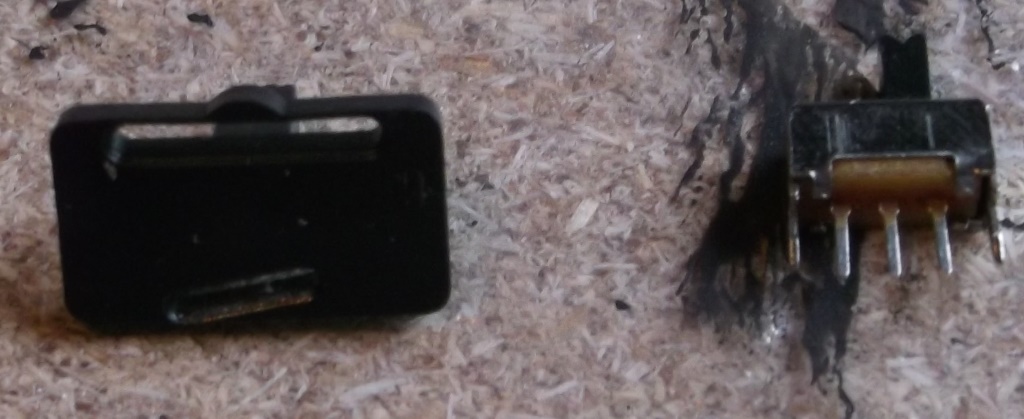
Solder the switches onto the cable and and on the battery. A test if it still lights up doesn't hurt. The switch on the right side is the one I used the left switch is the one that came with the tealights. The switches used are pretty cheap like 0,20 € a piece from the local electronic craft store.
Step 8:
Add the lamps to the gallows and glue the wire in the channels. Stick the gallows into the square whole of the base and glue them. You can use hot glue to cover bare contacts and help the gallows to stand up if they tend to fall. I wanted my lamps to stand a little aslope as they will be standing later on a table of terrain that isn't flush. So why should the lamps stand up extremly straight, I thought. I also covered some electronic like the back of the switch with cardboard to ensure no liquid will tough them as I will apply muddy basing material. Make sure to cover all wholes in the plastic base. Use cardboard and fixing pins to add some details.

Step 9:
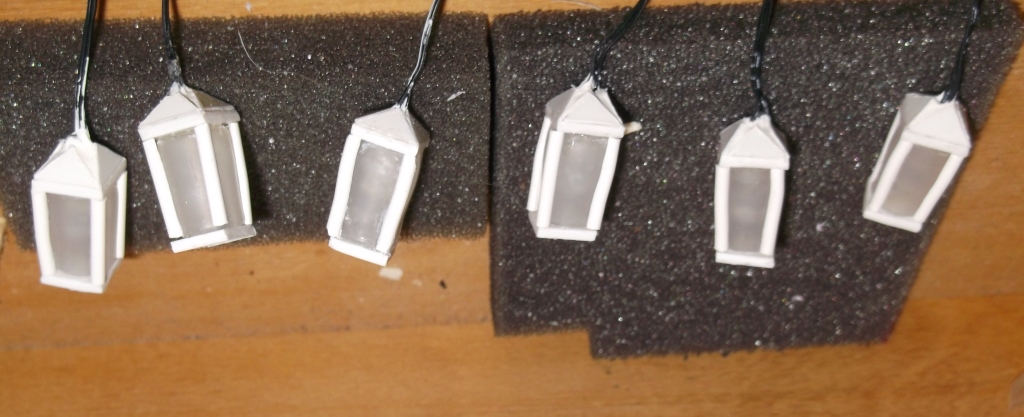
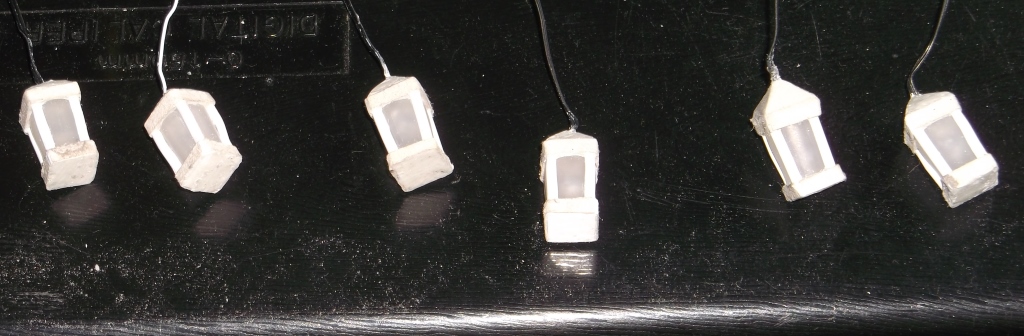
Add basing Material to the plastic bases and paint everything up. If your lamps tend to fall over add more basing material and or heavy things like stones to add weight to the base. If you are like me remove the batteries until everything is dry again. Just be very careful that the paint doesn't reach the fake flames. Also don't dull coat the lamps or cover the fake flames if you decide that a securing coat is necessary. And this is what the ready lamps look like. I really like the flickering as it adds more atmosphere to the table. Maybe I will later cover the small black switch pins with fake stones to hide them. But at the moment I don't feel like that.
If you liked this tutorial and decided to build your own lamps I would be more than happy to see your pictures here below. If there are any questions feel free to ask.
as promised here is some sort of a tutorial. I just sommon up what I did to make my idea of cheap and good looking lamps that do actually glow come to the tabletop in 10 steps. As I try to work efficient in the hobby you will see that I have made all my lamps at once like a production line. That's why I would suggest if you want to build them choose your amount of lamps first. I chose to build 6 lamps.
Components:
- a hobby knife
- a wire brush (optional)
- sand paper (optional)
- a small saw, i.e. a hacksaw
- white glue or PVA or carpenters glue (not sure about the right wording)
- super glue
- a stick from a New Year's Eve Rocket, but you can buy them from i.e. hardware stores or craft stores as well.
- an old IDE cable
- a soldering iron + tin-solder
- basing material of your choice
- colors to paint the lamps
- a little bit of cardboard (the stuff around some food that you would normally throw away)
- some tiny fixing pins with small heads (optional)
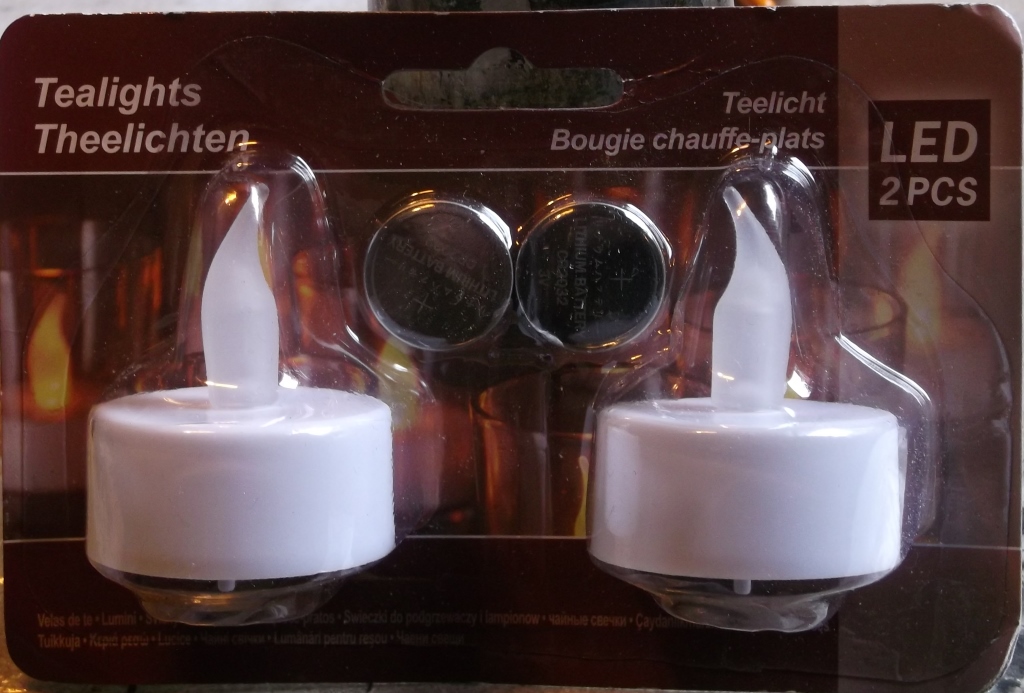
- electric tealights (usally you can get them pretty cheap like 1€ for 2 tealights)
- Some propper switches (the ones on the right side of this picture) as the ones in the tealights are not that good for this projekt.
- some plastic card (optional)
- some lolli pop sticks or thinn plastic pipes
- some modelling putty, I used white Milliput.
- some hot glue (optional)
- tape measure, but you can get away withou it. Since the lamps should get a fantasy/ old age/ hand made appearance.
Step 0:
I choose to have my lampposts in the shape of gallows. I sawed the New Year's Eve Rocket sticks into a a short and a long stick for every lamp. The long side is roughly 9,5 cm and the short side is roughly 3 cm. Don't go too high as your lamps could fall over when placed onto terrain. With this length a human Confrontation model will fit under the lamp easily. I sawed half in where I wanted them to join. Then I cleaned them with a knife, sanded them. Knife and wire brush were used to get more wood texture to the sticks. Then I glued them together with PVA.
Step 1:
I took the tealights carefully apart.
Step 2:
I took the fake flame, without the LED inside, and carfully sawed the top off. That will later be be used upside down to build the translucent body of the lamps. Then I checked that the LED will fit in on the other end.
Step 3:
Then I pealed of the connector plug of the IDE cable and carefully pealed of pairs of two wires, on pair for each lamp. i was surprised how easy it was to get pairs of two off the cable.
Step 4:
I choose to use the tealight stands so i cut everything away that added hight and made a square whole for the gallow to sit in. Then the LED was soldered to a pair of that wire from Step 3. Then a channel was carched into the gallows for the cable to fit in flush.
Step 5:
I started the lamps themselves with a square piece of plastic card and glued it under as a base and formed the top with glued on plastic card triangles. I used tinny plastic pipes, that I had in my bits box for a while, and carefully cutted them in half to frame the body of the fake flame. If you have some gaps in this step don't worry, we come to that later. Leave your lamps to dry completly before you continue on them.
Step 6:
I wrapped and glued a rectangle piece of paper around the lamp stand. Then I covered all gaps with putty, white Milliput in my case. Give the putty enough time to dry, don't be like me. Or you have to fix some stuff up.

Step 7:
Solder the switches onto the cable and and on the battery. A test if it still lights up doesn't hurt. The switch on the right side is the one I used the left switch is the one that came with the tealights. The switches used are pretty cheap like 0,20 € a piece from the local electronic craft store.
Step 8:
Add the lamps to the gallows and glue the wire in the channels. Stick the gallows into the square whole of the base and glue them. You can use hot glue to cover bare contacts and help the gallows to stand up if they tend to fall. I wanted my lamps to stand a little aslope as they will be standing later on a table of terrain that isn't flush. So why should the lamps stand up extremly straight, I thought. I also covered some electronic like the back of the switch with cardboard to ensure no liquid will tough them as I will apply muddy basing material. Make sure to cover all wholes in the plastic base. Use cardboard and fixing pins to add some details.
Step 9:
Add basing Material to the plastic bases and paint everything up. If your lamps tend to fall over add more basing material and or heavy things like stones to add weight to the base. If you are like me remove the batteries until everything is dry again.
Just be very careful that the paint doesn't reach the fake flames. Also don't dull coat the lamps or cover the fake flames if you decide that a securing coat is necessary. And this is what the ready lamps look like. I really like the flickering as it adds more atmosphere to the table. Maybe I will later cover the small black switch pins with fake stones to hide them. But at the moment I don't feel like that. If you liked this tutorial and decided to build your own lamps I would be more than happy to see your pictures here below. If there are any questions feel free to ask.


